9 Easy New Year’s Resolutions for your Mind, Body and Home

9 easy new years resolutions for your mind body and home

The new year is almost here and for many people that means making a new year’s resolution or two. The problem with new year’s resolutions is, they are often hard to keep and not practical. A new year’s resolution doesn’t have tp be something elaborate or hard to be life-changing. You can simply make easy lifestyle choices and changes that make your life better in the end. Here are some new year’s resolutions for your mind, body and home that not only will help you find your center, but may even save you a bit of money and/or sanity.


9 Easy New Year’s Resolutions for your Mind, Body and Home


For Your Mind:

1. Pinpoint ONE thing that you need to get organized to have your life running smoothly. While “get more organized” is a great resolution, it can easily become more daunting that expected and leave you folding in the end. Instead, pick a simple action you can take now to organize. For example, maybe for you, it’s a matter of being better at remembering appointments or important dates. Find a way to do this that works for you and see your stress level go down.

2. Take 10 minutes a day to free your mind and just breathe. This can be an amazing resolution and one that most people find it easy to keep.

3. Take on a simple hobby. Don’t put too much pressure on yourself, though. Remember, you have a whole year to try. It can be “learn to crochet” for example. Hobbies help our minds relax and can bring lots of joy.


For Your Body:

4. Change one thing in your diet. If that is something as simple as eating out less, then do that. You don’t have to do a lot to reap the benefits.

5. Devote 1 hour a week to getting active. This doesn’t have to be 1 hour at one sitting, either. If your day is so busy, try doing 15 minute sessions of yoga. (If you are a big girl like me, you might like my tips for doing yoga when you are plus sized post)

6. Be kind to your body by switching to natural remedies for your beauty and health. Making some of your own stuff like body butter, deodorant, lip balm, body wash and sugar scrub is low cost and luxurious! (Make sure you also check out my post on 50 things you can make with coconut oil!)


For Your Home:

7. Make a promise to skip chemicals when cleaning. I have several recipes for cleaners like “soft scrub“, soap scum remover, oven cleaner, dishwasher tabs, and of course my list of 10 uses for Dr. Bronner’s soap. You really can clean most things in your home with just baking soda, vinegar, and Dr Bronner’s.

8. Simplify. Living a minimalist lifestyle really will make it easy to clean, entertain and live in your home and it saves money as well.

9. Stop stressing about ever detail at home. Make a pact with yourself to not worry if your home is perfect or spotless all the time. You create a whole boatload of unnecessary stress for yourself when you do.


What is your New Year’s resolution this year? What do you plan on changing? Let me know in the comments!


Homemade Hazelnut Chocolate Spread Recipe (Homemade Nutella)

Thank you to Hamilton Beach for sponsoring today’s tasty recipe!

homemade Nutella recipe

When it comes to holiday food, nothing says it better than decadent chocolate goodies. One of these is Nutella (hazelnut chocolate spread). While hazelnut spread has gotten cheaper over the years, I always like to try to make as much as I can homemade as it contains no preservatives and I know what is going in my family’s bodies.

Making homemade Nutella is a process and it require patience, but it is so simple to do. I used my Hamilton Beach® Stack & Snap™ 10 Cup Food Processor to do it and it made it even easier. If you have a food processor, you probably know about the pain they can be to use. You have to line up things just right in order to use the machine and this can be very nerve-racking and is often a reason people don’t use their food processors much anymore. With the Hamilton Beach® Stack & Snap™ 10 Cup Food Processor, it only fits one way and it easily snaps in place, so making homemade hazelnut chocolate spread is a joy. Plus, I loved that it didn’t even get warm when it was running this long.

food processor

You can use homemade hazelnut spread for snacks or decadent desserts. I plan on making truffles with the spread I made here. One difference between my homemade Nutella and other recipes out there is I use coconut oil in mine rather than the often called-for canola oil. I just think it adds a great dimension of flavor to it. I hope you enjoy this recipe as much as I do.

hazelnuts hazelnut spread

Homemade Hazelnut Chocolate Spread


Homemade Hazelnut Chocolate Spread Recipe (Homemade Nutella)
 
Ingredients
  • 2 Cups Roasted, Unsalted Hazelnuts
  • ¼ Cup melted Coconut Oil
  • ¾ Cup Powdered Sugar
  • 4 Tbsp Unsweetened Cocoa Powder
  • 1 Tsp Pure Vanilla Extract
Instructions
  1. Dump the hazelnuts into your Hamilton Beach® Stack & Snap™ 10 Cup Food Processor with the chopping blade attached. Snap on the lid and press the puree button. Leave it on for approximately 2 minutes. Shut off and remove lid. Your should now have finely chopped hazelnuts.
  2. Scrape the Sides of the bowl, then process for another 2 Minutes. It should look like wet sand at this point. Scrape the sides and process for an additional 2-3 minutes until smooth and creamy. It should not taste grainy at all.
  3. Add in your coconut oil and process for 1 minute.
  4. When that is fully mixed, add in the rest of your ingredients, scraping the bowl a couple more times. Process until fully mixed.
  5. Pour into a bowl and do a quick fold of any ingredients that are not fully incorporated. Place in a covered container (I like to use mason jars) for up to 2 months in the fridge. It will get thicker as it chills.
Notes
Be careful when handling the blade. It is very sharp!

Tips for Doing Yoga When you are Plus Sized

8 tips for doing yoga when you are plus sized

I started doing yoga a while back. I decided to do it because I often have stiff, sore muscles due to chronic pain caused by Lyme disease. It is incredibly helpful and since I can’t do many strenuous cardio or other exercises, it gives me a chance to get some healthy workout time in. It also helps me relieve stress as well as keeps me grounded. I have noticed that not only do I feel better physically, but it keeps me feeling positive as well.

One of the issues with doing yoga, though, is the fact that many of the positions are hard to do when you are plus sized like I am. Simply and bluntly put, my extra “stuff” gets in the way and I am far less flexible as well. This doesn’t stop me, however! Here are some tips for doing yoga if you are pleasantly plus sized like myself!


Tips for Doing Yoga When you are Plus Sized


Get yourself a yoga mat. You definitely need one no matter what, but as a plus sized individual, I highly recommend one. Since it can be hard to hold the positions, and your joints may be in pain, you will need some extra cushioning for your yoga time. Yoga mats do not have to cost a lot, either. There are many great low cost yoga mats online that cost less than $10.

Drink plenty of water before and after you do your yoga session. Many people equate yoga with stretching and not really getting your heart going. This is false and I quickly learned this the first time I did it. I sweat a lot when I do my yoga and so I found out that it is vital to drink lots of water before and after my yoga session.

Listen to your body. Yoga can and will be uncomfortable at first, but it should never hurt. If you are finding that it is hurting too much to do certain stretches and positions, skip them or do what you can. With practice, you will get better.

Modify positions. You can modify some positions in yoga to make them easier for you to do. For instance, during Sun Salutations, when I get to the Swan Dive and the Standing Lunge, my belly gets in the way. I don’t try to move my body in a way it won’t. Instead, I don’t do the full lunge and I tuck my hands behind my back rather than forward to give my belly more stretching room.

Try out different sets and find ones your body works for. Don’t feel defeated if you can’t do some stuff. It’s OK! Try to remind yourself of what you ARE capable and not what you aren’t.

Get some good yoga clothing. Again, this does not have to cost a lot. I work out in cheap leggings and a cotton tunic top. I do recommend a great (not just good!) sports bra if you are busty. Many of the positions in yoga call for you to bend forward and a good sports bra will keep your (ahem) “ladies” in place.

Challenge yourself regularly. While you should not feel bad about not being able to do certain positions, you should also not deny yourself a challenge. Keep trying harder positions. You will get more flexible over time.

Do Partner Positions. These are great for helping each other achieve a goal and they allow you to support each other while trying to do some more challenging positions.


Do you do yoga as a plus sized individual? What are some of your tips?


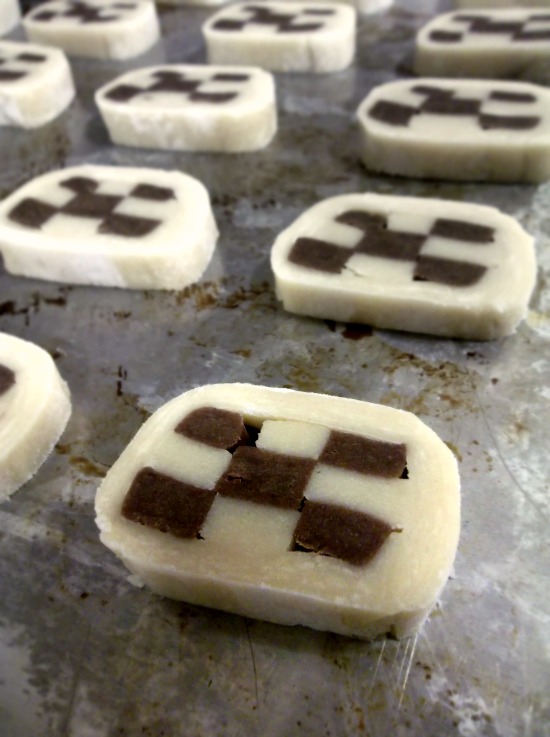
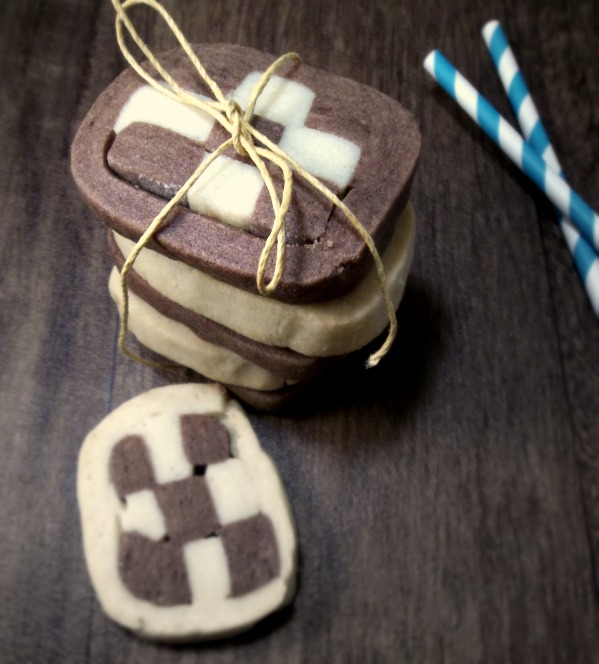
Checkerboard Cookies

Checkerboard Cookies

When I was a child, my mom would make pinwheel cookies around the holidays and occasionally, at other special times of the year. These cookies were time consuming, but so beautiful and fun to eat. When I went into culinary school, I failed almost every portion of baking except making these cookies. They turned out beautifully and I fell in love with making them. I only make them around the holidays because they are so labor intensive. They can literally take you 2 days from start to finish because they are what is referred to as “icebox cookies”. That is, they are not a quick dough, but rather the kind that needs to harden in the fridge before you bake them. Since they are created in stages, this means even more hardening and cooling time between steps, however, they are so worth it in the end.

cookie recipe

I found a recipe for these on 17 and Baking, but after trying that exact recipe a couple of years ago, I had to tweak it a bit to be more what I was looking for. For instance, I do some extra steps and I add extra vanilla and flour to get them to come out soft as I like them. I also cut them thicker to get that crumbly,soft, buttery goodness I crave. Additionally, I use more cocoa powder and less salt as I found the first batch I made to be slightly too salty and didn’t have a strong enough chocolate flavor. I also use my homemade vanilla extract. Make no mistake, these cookies will be a hit with any party you take them to and are well worth the time you take to make them.

checkerboard cookie recipe

Checkerboard Cookies


5.0 from 1 reviews
Checkboard Cookies
 
Ingredients
  • 5½ cups flour
  • 1 Tsp Baking Powder
  • ½ Tsp Salt
  • 4 Sticks of room temperature butter
  • 1½ Tbsp Vanilla extract
  • 2 large Eggs
  • ⅔ Cup Unsweetened Cocoa Powder
Instructions
  1. Sift the baking soda, flour and salt together in a bowl.
  2. In a separate bowl in your mixer, cream the sugar and butter together. Add the eggs, one by one and then the vanilla.
  3. One cup at a time, add the flour mixture using your dough hook. Sprinkle flour on your surface and remove dough from mixer. Continue to knead together, but don't over-work the dough.
  4. Divide the dough in half. Place half of it on your surface and fold in the cocoa powder until well-distributed.
  5. Cut each dough in half and form into two logs of each flavor. Wrap in plastic wrap and place in the fridge for about 2 hours.
  6. Take out one of each flavor and allow to sit at room temperature for 20 minutes. Roll out on a floured surface into a long rectangle about a foot long and 6 inches wide and ½ inch in thickness. Using a pizza cutter, cut into 9 strips. Do this with the other flavor.
  7. Layer the strips on top of each other 3 in a row, 3 high; vanilla, chocolate, vanilla and so on. Dampen your fingers and fuse them together with water. Do this the opposite way with the other pieces. You should have two logs. Wrap them in plastic wrap and place in the fridge for a minimum of 2 hours.
  8. Pull out the other solid logs and sit them at room temperature for 20 minutes. Roll out on a flowered surface about a foot long and ¼ of an inch thick. Place the log with the mostly chocolate pieces on the vanilla dough and wrap it around the checkerboard. Make sure to use a little bit of water to act as a glue and lightly apply it to the inner surface. Seal up any cracks and smooth them out with a small amount of water as well. Use a light hand.
  9. Do the same with the mostly vanilla log. Place both logs back in the fridge for a minimum of 4 hours (or overnight).
  10. To bake, take each log out, one at a time, and cut with a sharp knife into ½ inch cookies. Bake on an ungreased cookie sheet for 17-20 minutes on 350 Degrees F until to bottoms are golden brown. Cool on a rack for 10-15 minutes before storing or eating.
Notes
You can freeze the logs once they are complete and thaw to bake later.

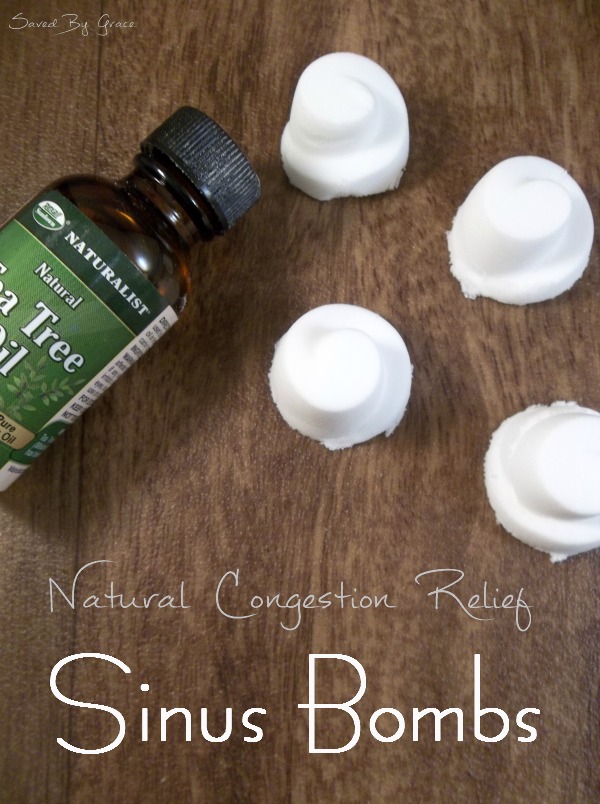
Natural Congestion Relief- Sinus Bombs

Natural Sinus Relief Sinus Bombs

Cold and flu season is in full force now and if you are anything like me, you are sick of pills, pills and more pills to start feeling better. You are looking for a natural kind of relief from your sinus congestion. You are hoping for a sinus infection home remedy that will work well and fast. I heard that tea tree oil could actually clear up sinus infections and I have seen shower bombs made for congestion. My only issue was, sometimes you don’t have time to take a shower several times a day when you are sick to get relief. So, I came up with these mini sinus bombs to use in the sink. I hope you find relief with these as they are super simple and super easy t make.

Natural Congestion Relief- Sinus Bombs


3.0 from 2 reviews
Natural Congestion Relief- Sinus Bombs
 
Ingredients
  • 1 lb of Baking Soda
  • Spray bottle filled with Water
  • 10 drops of Lavender Essential Oil
  • 20 Drops Tea Tree Essential Oil
Instructions
  1. Pour your Baking soda into a bowl. Spray the baking soda with water, just enough to make it start to stick together.
  2. Mix it up and see how well it forms in your hand. It should feel like damp sand.
  3. If it is not moist enough, spray water again until it easily sticks together but does not feel wet, only damp and moist. Add in your essential oil and mix again.
  4. Place in molds. I used silicon ones because I found that they come out easier. I used candy molds as they are the perfect size for these mini sinus bombs.
  5. Leave in the molds overnight and pop them out. Store in an airtight container that keeps moisture out.
Notes
To use:
Fill your sink with very hot water. Close the door to your bathroom as this is the ideal place to do it.
Pop one bomb into the water and place a towel around your head to create a barrier for the steam. Inhale the steam for relief from sinus congestion.
Do this as often as needed.

50+ Mason Jar Crafts

50 Mason Jar Crafts

The mason jar. Originally designed to be a place to store vegetables and fruit through the winter in a canning process, it is now the center of crafters everywhere. There really is so much you can do with a mason jar. From tea light candle holders to gifts in a jar, I have compiled a list of 50+ mason jar crafts for you to explore and do whenever the mood strikes you. Here are some awesome mason jar crafts to inspire you!


50+ Mason Jar Crafts


1. Prism Candle by DIY Ready

2. Gold Mason Jars by Mason Jar Crafts Love

3. Embellished Mason Jars by Balancing Beauty and Bedlam

4. {Let it Snow} Mason Jar Candles by The Frugal Girls

5. Mason Jar Salt & Pepper Shakers by Landeelu

6. Apple For the Teacher Mason Jars by Roadkill Rescue

7. DIY Mason Jar Vanity Light by Bless’er House

8. Mason Jar Superhero Banks by Fireflies & Mudpies

9. Mason Jar Candle Holder for a Beach Wedding by Plaid

10. Vintage Picture in Mason Jars by Suzy’s Artsy Crafty Sitcom

11. DIY Vanilla Extract in Mason Jars by Saved By Grace

12. Fairy Jars by Momdot

13. DIY Start Etched Mason Jars by Soap Deli News Blog

14. Snowy Pinecone Candle Jars by Crafts By Amanda

15. DIY Mason Jar Snowglobe by Classy Clutter

16. DIY Fancy Tumbler by Pretty Providence

17. Chalkboard Mason Jar Candle Centerpiece by Love.Heart.Always.

18. Sewing Kit in a Jar by Funky Time

19. Painted Textured Letter Vase by The Lettered Cottage

20. DIY Rustic Mason Jars by Rusted Treasure

21. Mason Jar Silverware Caddy by One Krieger Chick

22. Mason Jar Candy Pedestals by Living Well, Spending Less

23. Sweet Fabric Lined Votive by Fellow Fellow

24. Branch Vase by Garden Mama

25. Glitter Jars by Kleinworth & Co.

26. Pottery Barn Mason Jar Knock-Off by Crafts Unleashed

27. Animal Topped Mason Jars by Mason Jar Craft Love

28. Mason Jar Picture Frame Vase by Home Stories A to Z

29. 5 Minute Mason Jar Lamp by Crafts Unleashed

30. Mason Jar Bathroom Storage by Lolly Jane

31. Mason Jar Wind Chime by Mason Jar Craft Love

32. Mason Jar Soap Dispensers by Our Lovely Bungalow

33. Paint Drip Mason Jars by Mason Jar Craft Love

34. DIY Funfetti Candles by Beth Cakes

35. DIY Mason Jar Chandelier by BluRubie

36. Vintage Desk Organization Jars by DecoArt Blog

37. Chevron Pallet Mounted Mason Jar Vase by Unoriginal Mom

38. Moroccan Mason Jar Candle Holders by Put it in a Jar

39. Sea Glass Mason Jar by The Country Chic Cottage

40. Mason Jar Porch Lights by Beyond the Picket Fence

41. Mason Jars: Painted and Distressed by It all Started with Paint

42. DIY Natural Room Scents in Mason Jars by The Yummy Life

43. DIY Playdough Mason Jars by Living Chic on the Cheap

44. Mason Jar Honey Combs by Lauri at Bee Source

45. DIY Mason Jar Citronella Candles by Premeditated Leftovers

46. Single Serving Pie in a Jar by Our Best Bites

47. Mason Jar Terrariums by Apartment Therapy

48. Mason Jars with Blue Patina by Suburble

49. Christmas Scented Stovetop Potpourri by Crafting Chicks

50. Citrus Vanilla Sugar Scrub in a Jar by Saved By Grace


What are you excited to make on here? I have a million ideas buzzing around in my head after compiling this list of very creative crafters!


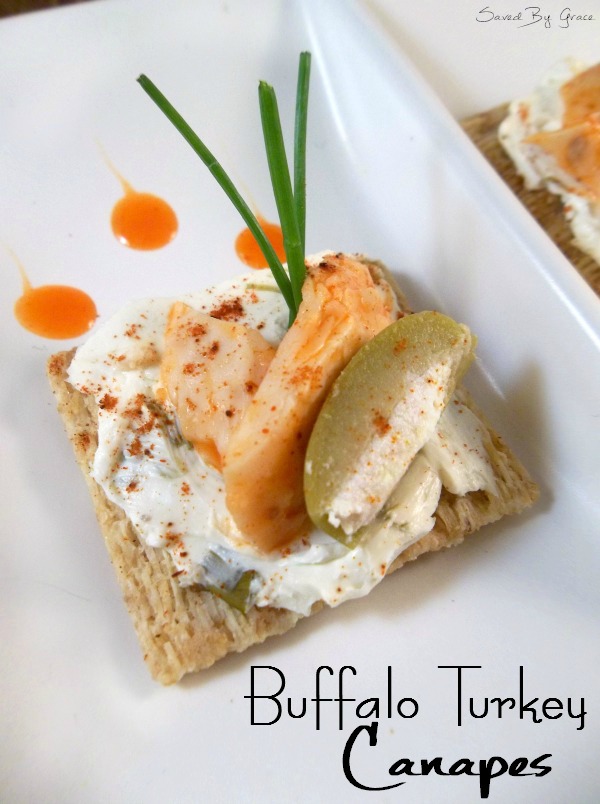
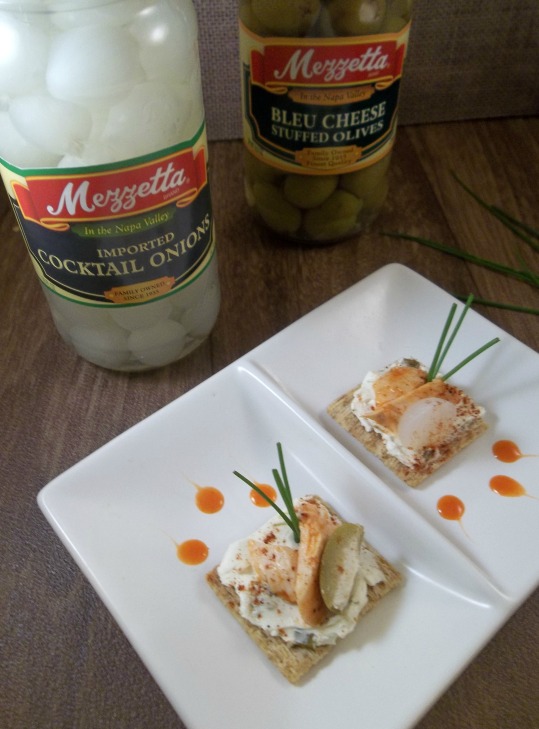
Buffalo Turkey Canapes with Mezzetta Olives

Thank you to Mezzetta for sponsoring today’s wonderful memories and recipe for sharing joy this holiday season.

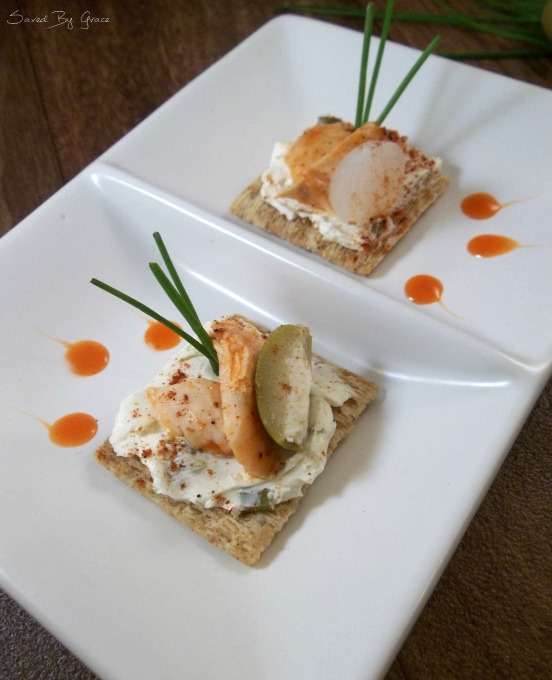
Buffalo Turkey Canapes

As a child, the olive plate and appetizers were one of my favorite parts of the holidays. I felt like I was at a fancy buffet as my eyes lit up with all of the beautifully arranged goodies on fancy dinner plates and serving platters that were only brought out once or twice a year. One of the reasons I was so drawn to them was the tiny foods looked like miniature meals I would feed a mouse and of course, I, like most children, loved to put olives on each of my fingers and eat them off one, by one.

This amazing memory is one that inspired me to create these Buffalo Turkey Canapes. Well, that, and I had plenty of leftover turkey in my fridge and felt this would make great use of it as well as creating another delicious mini-meal to share joy with the folks I love. Mezzetta makes it easy to create inspiring holiday recipes, too.

Olive canapes

They are very simple to put together and would be a great way to make Mezzetta memories with your kids since they can help you assemble them with ease. A canape by it’s very nature is 4 parts; a base, a spread or sauce, a main component and garnish. I used two garnishes for this. One, some Mezzetta Olives and two, a sprig or two of fresh chives under the turkey.

Buffalo Turkey Canapes with Mezzetta Olives

To make the turkey have it’s kick, just break it up into chucks and add about 2 tbsp of hot wing sauce per cup of turkey.

Take a cracker of your choice. I used woven wheat crackers for their nuttiness and great texture as the base of my canape. Spread the cream cheese on it evenly.

Top with criss-crossed sprigs of fresh chive.

Add a bite sized amount of buffalo turkey.

Top with a Mezzetta Blue Cheese stuffed green olive. You can either cut these in half or leave them whole.

Alternatively, you can also use pearl onions from Mezzetta as well like I did here.

Peirce each canape with a toothpick or small appetizer fork and serve.

Canapes

To help you create more memories of your own using Mezzetta products like I did, make sure you print of this 50 cent coupon to try your hand at creating something amazing for your holiday parties this season!

Also, don’t forget to enter to win your own Mezzetta Gift Basket. There is a prize given away each day through December 31, so that is 31 chances to win! Just visit the folks at Mezzetta, and enter some basic information for your chance to win! The gift basket contains:

• 100% Italian Estate Grown Extra Virgin Olive Oil
• Golden Greek Peperoncini
• Garlic Stuffed Olives
• Castelvetrano Olives
• Pitted Greek Kalamata Olives
• Roasted Marinated Red & Yellow Sweet Bell Peppers
• Cocktail Onions
• 1 Apron (from House Party contents)
• 1 Metal Olive Spoon (from House Party contents)
• 1 Tote Bag (from House Party contents)
• 1 Ceramic Bowl

It’s super easy to enter! Make sure you share your favorite holiday memories, too!

Click the image below to get your 50 cent off coupon for awesome Mezzetta products and to enter the 31 days of giving giveaway!

coupon


5.0 from 2 reviews
Buffalo Turkey Canapes with Mezzetta Olives
 
Ingredients
  • 1 cup of Buffalo Turkey
  • 1 Jar of Mezzetta Blue Cheese Stuffed Green Olives
  • 1 Jar of Mezzetta Cocktail Onions
  • 1 Container of Chive and Onion Cream Cheese
  • Fresh Chives
Instructions
  1. Spread the cream cheese on your cracker.
  2. Top with criss-crossed sprigs of fresh chive.
  3. Add a bite sized amount of buffalo turkey.
  4. Top with a Mezzetta Blue Cheese stuffed green olive. You can either cut these in half or leave them whole.
  5. Alternatively, you can also use pearl onions from Mezzetta as well like I did here.
  6. Peirce each canape with a toothpick or small appetizer fork and serve.

Non Toxic Oven Cleaner

non toxic oven cleaner

One of the chores I hate doing the most is cleaning the oven. One of the biggest reasons was the chemicals I would have to use on it in order to do the job. They are toxic and I hated having them in the same space as the place I cook my family food. I started experimenting with different ways to remove the gunk in my oven the natural way and using several of my favorite natural cleaners, and doing some research, I came up with this concoction. It uses normal things you probably have right now in your kitchen. And, it doesn’t produce and toxic gas.

Here is what my oven looked like before I started. Don’t judge. I told you I hated cleaning it.

oven


Non Toxic Oven Cleaner


You will need:

1 16 oz box of Baking Soda

1/4 Cup Water

Spray Bottle of Vinegar

4 tsp Dr Bronner’s Soap in Tea Tree


Before you start, unplug your oven for safety.

Mix the baking soda, Dr. Bronner’s and Water together. It should create a thick paste. Add more baking soda if it is too runny or more water in small amounts if it is too thick. It should be about the consistency of toothpaste. Spread it on all parts pf your oven including the racks. Set the racks aside. You can come back to them.

Spray down all areas with the vinegar. It should bubble up slightly. Allow to site for at least a half hour. Sprinkle some more baking soda on top and spray it again with the vinegar and allow to sit overnight. Make sure NOT to spray the heating coils and do not place the paste on them either. Avoid touching it at all, if possible.

natural oven cleaner

When you are ready to clean, grab a cloth that is damp and start wiping. If an area is super baked on, it may take a little elbow grease or you may need to treat it again. Try spraying with more vinegar as well.

My husband also got into it when he saw me cleaning the oven and took a straight razor to scrape off some of the heavy baked on grease from the glass door.

To clean the racks, I just let them sit overnight and used more vinegar, and a bit of Dr. Bronner’s soap. To scrub them, I used rolled up aluminum foil. (You can also use the foil if you need to inside your oven as well.)

Make sure to wipe out the oven well after. I left some bits of baking soda and the first time I baked in it afterwards, it flaked off on the bottom of the oven.

After all of this, my oven looks awesome and I didn’t have to use a single chemical!

oven clean


Can you believe the difference here?

oven cleaner