Hemp-Flax Granola Bar Recipe

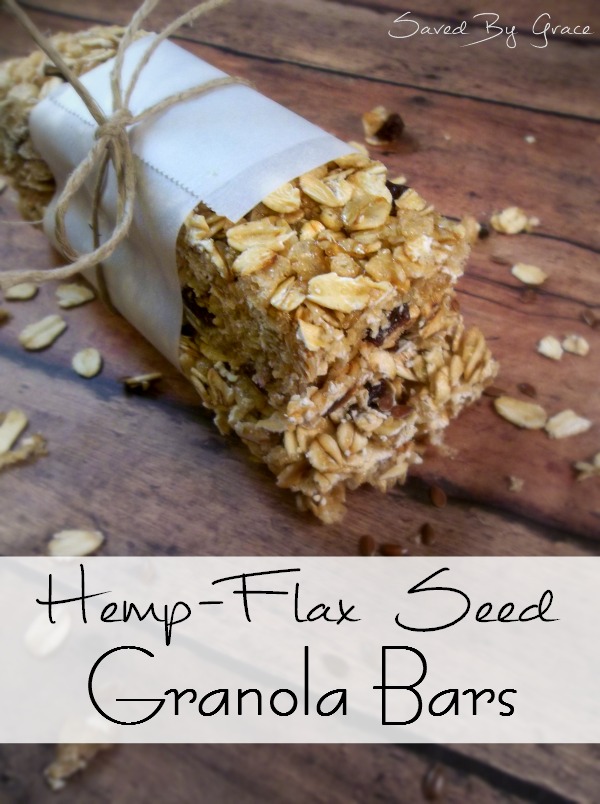
Granola Bar Recipe- Make these flax seed granola bars with hemp protein powder. This is a healthy granola bar recipe kids will love!

I am a big fan of granola bars. They are the perfect snack on the go and I love that I can take one with me in my bag or in the car for a good snack that gives me energy and temporarily curbs cravings. The only problem is, the ones sold in stores are usually laden with high fructose corn syrup, preservatives and fake colors and dyes. I decided to make my own granola bar recipe that would not only be really tasty, but also full of really good stuff I could sneak in for an extra nutritional boost.

This granola bar recipe calls for a couple of ingredients you may or may not be familiar with. One is flax seeds and the other is hemp protein powder. Both of these can easily be obtained at many stores, usually health or natural ones or bought online. The reason I included these two ingredients is for nutrition’s sake.

Flax seed is something I try to throw in whenever I can to many of my dishes here at home. It tastes awesome in Asian-style recipes and delicious in pasta sauces. I am so obsessed with it because it has a good amount of magnesium which is a natural fighter of pain. I also like it because it has B vitamins as well as Omega-3 fatty acids which are great for your heart. Don’t be scared, flax seed is virtually tasteless and so tiny, you often won’t even notice it in your dishes or this granola bar recipe.

Hemp protein powder is not what you think it is. It is not going to get you high and does not contain THC, so rest easy moms. You won’t be giving your kids anything that will leave them feeling anything different. Hemp is made from the male version of the cannabis plant (the female version is what contains the THC) and is used for everything from paper, to clothing fibers and even fuel for cars. Hemp really is an amazing renewable resource. In this case, it is a powder that is amazing for digestion and your heart because it contains a healthy dose of protein, fatty acids and fiber. In this recipe, you won’t taste it at all, but it does sometimes have an earthy kind of taste.

flax seed granola bar recipe

Feel free to mess with this granola bar recipe and add nuts, other dried fruits and even chocolate chips! I hope you enjoy my recipe and make sure to share it with your friends!

Hemp-Flax Granola Bar Recipe


5.0 from 1 reviews
Hemp-Flax Granola Bar Recipe
 
Ingredients
  • 2 C. Crispy Rice Cereal
  • 3½ C Oats (quick oats)
  • 3 Tbsp Butter
  • ½ C Raw Cane Sugar
  • 3 Tbsp Brown Sugar
  • 1 Tbsp Vanilla Extract
  • 1½ Tbsp Flax Seed
  • ⅓ Honey
  • 1 Tsp Hemp Protein Powder
  • ½ Cup to 1 C Raisins
Instructions
  1. Start by mixing the cereal, oats, raisins and flax seed together in a glass or metal bowl.
  2. In a pot on the stove, mix together the sugars, butter and honey over medium heat Continuously stir until everything is liquid.
  3. Add in the vanilla extract and stir. Add the hemp protein powder and mix in well. Remove from heat and pour over the cereal mix.
  4. Quickly stir in to mix well and coat all dry ingredients.
  5. Line a jelly roll or cookie sheet pan (with sides) with parchment paper. Pour the mixture on it and evenly spread out. Do not spread too thin. You want the bars to be about ½ an inch thick. Compact them together.
  6. Place a second sheet of parchment paper on top and using a cutting board or another pan, press the bars down well to make sure they are very well compacted. This is important so when they cool completely, they won't crumble apart too easily.
  7. Place your pan in the fridge and allow them to harden completely. Take them out of the pan in once piece and cit into bars.
Notes
These keep for a couple of weeks in the fridge as long as they are individually wrapped. You can also freeze them.

More Awesome Recipes

Homemade Vanilla Extract

Checkerboard Cookies

Teriyaki Oven Jerky

How to Find Time to Cook (When You Don’t Have Time)

How to Find Time to Cook

More and more people are eating out these days. Not only is it because we are so busy, but it is super convenient as well. It can get us in and out of the door in only a few minuets and if you go through a drive-thru, it’s even quicker. The unfortunate problem with eating on the go is of course the loss of nutrition from fast food or take-out and the big one for most people is the cost. We used to eat out a lot, and when I sat down and figured out the cost, I was ashamed of how much we were spending each month. The amount we spent on eating out would have left us eating like kings and queens if we spent that money on groceries at home.

With me, eating out is just too convenient. We live right down the block from a strip on a busy street filled with anything from local joints to every fast food restaurant imaginable and even some chain sit downs. I also suffer from chronic pain and fatigue and honestly, just cooking is sometimes too much for me to handle and so I give in and get something less than ideal. I have learned a few things along the way to prepare me for my bad pain days or the days when we are just too busy. Here are my tips on how to find time to cook, even when you don’t have time.


How to Find Time to Cook (When You Don’t Have Time)


Keep easy meals on hand at all times. Sit down and make a list of meals you can make with minimal ingredients. This can be as simple as pasta with some sauce or soups. One of my favorite cheap and easy meals I can make is my Hamburger Casserole. I almost always have those ingredients on hand.

Make freezer meals. This can be done pretty easily and only requires a little bit of your time. You can find tons of freezer meal recipes by just doing a quick search on Pinterest. I like to make soup in big batches and store some in my freezer. Its a quick meal I can pull out and make a sandwich with.

Meal plan. Planning meals takes a little bit of time, but if you do it on a weekly basis, it should only take you about 1/2 hour each week total. To meal plan, I always start with looking in my pantry, fridge and freezer. I make meals based on what we have on hand. I also keep a running list in a notebook of meals that my family loves and try to include 1 or 2 of these each week. If I have some ingredients I am not sure how to use, I do a quick search on Pinterest to find some good recipes to make using those ingredients. For instance, I had some beef broth the other day, so I typed in “Recipes made with beef broth” to see what I could make with other ingredients I had on hand. Doing this save me money because I am not buying duplicates or letting food go to waste. Plus, it saves me time because I already know what I will be making.

Cook in the crock pot. My crock pot is my friend. You can make so many meals in it and it does the cooking for you. This really requires no time. Just do one crock pot meal a week and you save so much time. Freezer meals are perfect for the crock pot as well.

Don’t make things overly complicated. A meal does not have to mean a big main dish with a starch and a veggie side with dessert. A meal can simply consist of soup and a sandwich or a salad with chicken. There are many quick things you can cook that are healthy.

Make some stuff ahead of time. If you start meal planning, you will be able to see what prep work can be done ahead of time. You can shred chicken, cut up some veggies and prepare some sauces a day or two before you need them. This can save time on a busy night.

How do you find time to cook when you don’t have time? I would love any tips you can share in the comments!


Spicy Ranch Cauliflower Wings

Spicy Ranch Cauliflower Wings Recipe

Cauliflower is one of my very favorite low carb snacks. While you can make some really great low carb dishes with it, this one in particular is not really super low carb, but it is a bit of a healthier choice due to the fact that it is baked, not fried. They get so delicious this way because they are soft and warm in the middle and crispy on the outside. Pair these guys with some great dip and you have yourself a snack that’s to die for. I call them “wings” because they really do remind me of boneless chicken wings. Due to the fact that these contain no meat, they are vegetarian and you could easily convert them to vegan if you used soy milk and Vegenaise instead of mayonnaise. This recipe is also egg-free if you use Vegenaise as well.

Spicy Ranch Cauliflower Wings


Spicy Ranch Cauliflower Wings
 
Ingredients
  • ½ Cup Flour
  • 1 Cup Panko
  • ¼ Cup Cornmeal
  • 3 Tbsp Dry Ranch Dressing Mix (store bought or homemade)
  • 1 tsp Chili Powder
  • ½ tsp Chipolte Powder
  • ½ tsp Cayenne pepper
  • Pinch of White Pepper
  • 3 Tbsp Mayonnaise
  • ¼ Cup Milk
  • 1 head of Cauliflower
Instructions
  1. Preheat oven top 450 Degrees F.
  2. Start by cutting the cauliflower into bite sized pieces. You don't want them so small that they are so tiny, but keep them about the size of a small chicken nuggets.
  3. In a medium sized bowl, mix together the cornmeal, flour and panko. Add in the ranch dip seasoning, chili powder, chipolte powder and white pepper.
  4. In a smaller bowl, mix together the mayonnaise and the milk with a whisk.
  5. Prepare a non-stick baking sheet with a small amount of olive oil to just coat it.
  6. Dip the pieces of cauliflower in the milk mixture and then toss in the dry mixture. Place on the cookie sheet. Place in the oven and cook for 15-17 minutes. Dip into your favorite dip. I like ranch.

Essential Oil Safety Tips

Essential Oil Safety Tips

You have heard me talk about essential oils so many times on my blog. This is because I am very passionate about them and what they have done to change the way I clean, live and take care of myself. However, essential oils can be used wrong and can be even dangerous if used in an incorrect manner. Here are some things to keep in mind when using essential oils.

Essential Oil Safety Tips


Essential oils are highly concentrated. Because of this, you don’t need much to get the job done. And you should also not use them directly on places like your face or even you skin on any part of your body, undiluted. Doing so can cause major skin irritation that can lead to serious skin problems. This is especially something to watch for when you are thinking of using essential oils on infants or young children. Their skin is so, so sensitive and it can have very serious effects on them.

Take only certain essential oils internally and only under the advisement of an experienced herbalist, naturapath or aromatherapist. Because essential oils are so concentrated, they can also cause issues for your liver or be too harsh on your body if you take them too much or too often. This is not to say that you should never do it, but rather that you should seek a professional opinion on the matter before you do so.

Know that some essential oils can make you more sensitive to the sun, even in low sun conditions. Some essential oils like those derived from citrus, especially, can make your skin very sensitive to the sun’s damaging rays. If you use one on your face or another part of your body that won’t be covered by clothing and intend to go outside, make sure to wait at least an hour after applying before doing so to help avoid a nasty burn.

Not all essential oils are created equal. Make sure to check with the company and on reviews to find out about the brand’s purity. An impure oil is more likely to give you adverse effects.

Use extra caution on applying essential oils to red, inflamed or broken skin. You may make it worse. Never apply it directly without a carrier oil such as coconut. Always ask a professional which to use and how often to use it. They can also give you the correct dilutions.

Keep essential oils out of reach of children and pets. Just like with many household things such as medications, cleaners and chemicals, essential oils must be kept away from children and our furry friends.

Check with a professional before using any essential oils if you are pregnant. As with medications and other outside elements pregnant women should avoid, there are some cautions they should also take with essential oils as well.


One last thing; This post is not to replace talking to a professional, naturapath, herbalist, doctor or aromatherapist. This post is for informational purposes only and is not meant to treat, cure or diagnose any ailments or health conditions. Please play it safe and speak with a professional regarding use of essential oils.


Oven Jerky

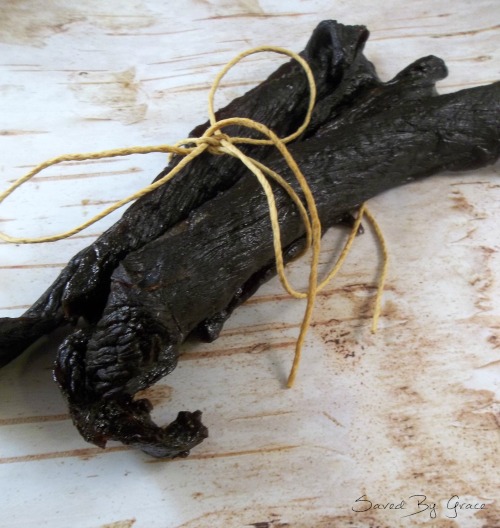
homemade oven jerky

One of my favorite low-carb snacks, hands-down, is beef jerky. I have tried my fair share of brands and I like all kinds of flavors from sweet to spicy and everything in between. The only problem with jerky is it is usually so full of preservatives that it goes from being something semi-healthy to snack on, but something that may not even be mostly meat anymore. I completely understand why it’s full of these things, as obviously meat isn’t typically shelf-stable if thrown in a bag, but I still want to try to cut them out as much as possible. The other issue with beef jerky is it is expensive. I can admittedly finish off a large bag by myself in just a couple of sittings and that turns into one expensive snack really quickly.

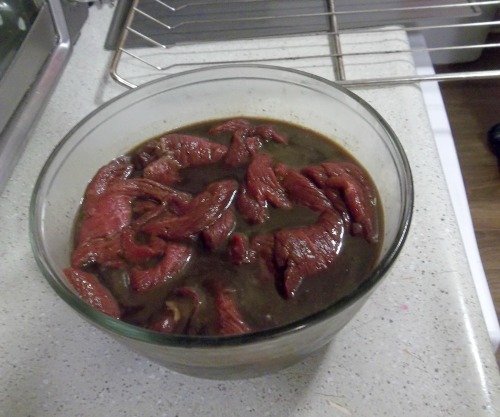
marinate

I always thought you had to own a dehydrator in order to make things like jerky. I did a little research and learned quickly that you can actually make it in your oven! I was so excited to get started on this project and my husband was, too!

skewers

I was able to get (1) 2.5 Lb Roast (London Broil is best- you want the leanest steak you can get) for $10. This yielded approximately 1 3/4 pounds of jerky. For me, that is a pretty good deal considering a 16 oz (1 lb) bag of jerky usually costs $15 or more dollars for my favorite brand.

oven jerky

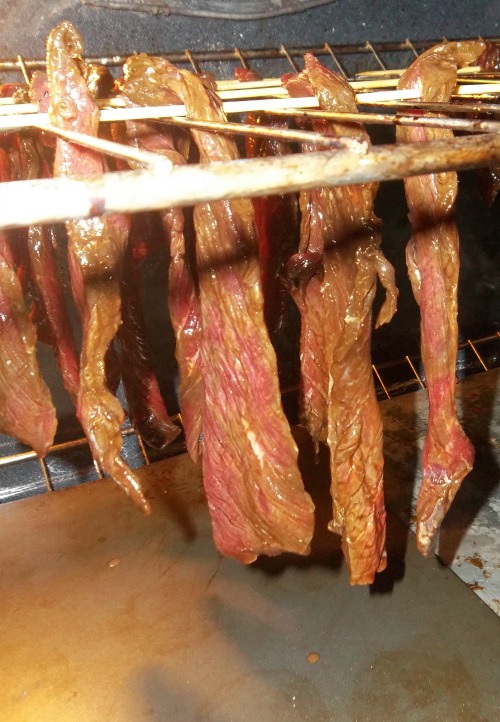
This jerky has a sweet taste, kind of like a teriyaki. This is my favorite flavor for jerky. You can always adjust the ingredients or add some that you desire more. One trick I saw on a website was to use skewer sticks and hang the jerky rather than lay it down. I really think this is ideal because it dries more evenly and since air is able to circulate, it also dries more quickly.

jerky

I hope you enjoy making this delicious jerky!

how to make jerky

Oven Jerky

Oven Jerky
 
Author:
Recipe type: Snack
Ingredients
  • (1) 2.5 Lb Lean Roast or London Broil
  • 1½ Cups of soy Sauce
  • ½ cup of Pineapple Juice
  • ½ Cup Brown Sugar
  • 1 Tbsp Ground or Fresh Grated Ginger
  • 2 tbsp Lemon Juice
  • 2 tbsp Toasted Sesame Oil
  • ¼ Tsp Black Pepper
  • A pinch of garlic powder
  • A Pinch of Onion Powder
Instructions
  1. Cut all visible fat off the meat. You don't want to leave any because it causes the meat to go rancid quickly during the process and when in storage.
  2. Cut the meat into strips that are pretty thin, but not easily torn. Set aside.
  3. Mix all of the ingredients well in a bowl. Place your meat in the bowl overnight, covered, in the fridge to marinate.
  4. When you are ready to start the drying process, soak your bamboo skewers into water for approximately 30 minutes.
  5. Take them out and start stringing meat, longways, on the skewers. I was able to fit about 4-5 strips per stick. You want enough space between them to let air circulate.
  6. Line your oven on the lowest rack, closest to the bottom, with cookie sheets. Move your second rack to the top space.
  7. Place your skewers on the rack and allow the meat to dangle between the slots like shown in the picture above.
  8. Turn your oven on to the "warm" setting if you have a dial style oven or 170 F if your oven is digital. Leave in the oven for approximately 4-4.5 hours. Keep an eye on it as ovens will vary. Your jerky is ready when it is tough, but not too dry and there is absolutely no more "juice" coming out of the strips.
Notes
Homemade Jerky needs to be stored in the fridge. I suggest not storing it in a plastic zipper style bag as it can harbor bacteria. I recommend a bamboo or glass container with a lid. It should keep for approximately 2 weeks if stored this way.

Brushing Teeth with Activated Charcoal

Brushing Teeth with Activated Charcoal

As someone who is always excited to try a new natural remedy or routine, I was excited when I started hearing about using activated charcoal to brush teeth with. I had been doing oil pulling and was happy with the results of that, so I am all for throwing another thing into my dental routine. I had first seen this on Pinterest, unfortunately I can’t remember exactly what website I was led to, but it got me thinking. Should I be giving this a shot?

The problem with many whitening toothpastes out there is the fact that you end up with something that can potentially make your teeth more sensitive if they are already like mine. I always worry about that since it can be quite painful to have sensitive teeth.

Let’s look at what I have discovered while trying out activated charcoal on my teeth.

Brushing Teeth with Activated Charcoal


What is Activated Charcoal?

Activated charcoal is completely different from the kind you use in your BBQ in the summer. It is charcoal that is processed and pressed with oxygen and zinc. It is the same stuff hospitals give to people for overdoses and poisoning (yes, for “stomach pumping”). It is safe to take. The reason it works is it binds to toxins and your body and on your teeth and removes them.

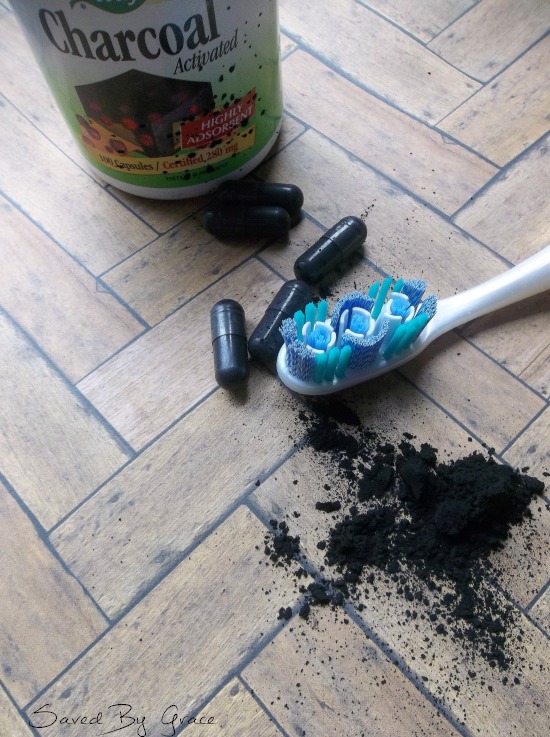
activated charcoal


How to use Activated Charcoal to Whiten Teeth


This was a trial and error sort of thing for me. I will make one warning so maybe you can avoid it if you are going to give this a try: it’s messy. There’s no way really around it. It will get everywhere. However, I did find some ways after doing it several times to lessen the amount of mess. Here’s my tips:

1. Open the capsules into something like a wide rimmed glass or bowl. They can be hard to open and if you don’t try to contain the mess, you will end up with it spread everywhere and possibly flying up in the air.

2. Wet your brush before applying the charcoal. It will help it stick better.

3. When you spit, do it under running water.

4. Use a different toothbrush than the one you used for brushing with the charcoal for your regular brushing. It is very hard to get completely off your brush.


My thoughts on the process:


I had visibly whiter teeth after just one brushing session. I am excited to see how much brighter they get over time.

The charcoal does not taste like anything, so if you are worried it will taste like a campfire in your mouth, never fear. There was also no grittiness as I expected there to be.

You will want to brush your teeth as you normally would after to completely remove the charcoal from your teeth and gums.

Activated Charcoal* is pretty cheap online. I found it for less than $5 with shipping. When I tried to buy it locally, I was looking at twice that amount.


This is my results after the 1st time. I see a difference here. I hope they continue to get whiter!

charcoal teeth whitening


From looking online, this can cause some sensitivity in some people’s teeth. You should NOT do this as a daily thing for a long period of time. It is only for a “boost” in whitening for short periods of time just as with other whitening products as it isn’t nessisary to do for maintenance.


Do you brush your teeth with activated charcoal? I would love to hear your thoughts!


*This post contains affiliate links. Thank you for making purchases through these links as it helps support what I do on my blog!

**This post is for informational purposes only and should not replace talking with your doctor or dentist. This information is not meant to treat, cure or diagnose any condition. Please seek a professional opinion before starting any home remedy mentioned on this blog.