Easy Enchiladas!

I love this meal. I am all about cheap, fast and easy-peasy meals!

This one is super easy and fairly cheap and you get a lot of it!

First, lets talk about the ingredients you will need:

~One can of re-fried beans

~About 2-2 1/2 lbs chicken breasts (you could also use thighs, I just prefer breasts)

~1 small can of black olives

~1 large can of enchilada sauce, your preference

~A drizzle of cooking oil

~Large tortillas, 10-12

~Shredded cheese

~Green onions

~Tomatoes

~Sour Cream

1. Start by poaching the chicken breasts, cooling them (this could even be done the night before to speed up the process) and shredding. Place in a pan to brown with a drizzle of oil. Pre-heat oven to 375

2. Add the can of re-fried beans. Combine with the chicken. It may be hard to do, so add about 2 tablespoons sour cream and a little bit of enchilada sauce to make it easier to mix. Add olives.

3. Put about a 1/3 cup of mixture in a tortilla, add some cheese and roll up like a burrito. Place it in a cake pan. I use my trusty glass cake pan for this. Make sure you have sprayed or oiled the bottom to prevent sticking. Do this until you have a full pan.

4. Drizzle the enchiladas with the enchilada sauce, top with a generous helping of cheese. Top with aluminum foil.

5. While it bakes, (about 20 minutes or less depending on your oven), cube tomatoes and cut up green onions.

6. Bake until cheese is melted and it looks piping hot, with sauce boiling. Turn on broiler and remove foil. Allow to crisp up for just a few minutes. Keep an eye on it!

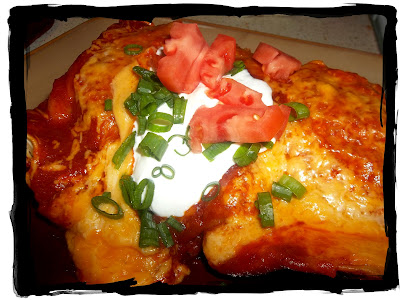
Pull your enchiladas, allow to cool for 5-10 minutes. Place on plate and top with green onions, tomatoes and sour cream! YUM!

TIP:
This is a very good way to use up leftover turkey at Thanksgiving! I just shred some bird and use it in place of the chicken. My husband loves it!


Click Here to print this recipe out!

Homemade Pancakes and a trick!

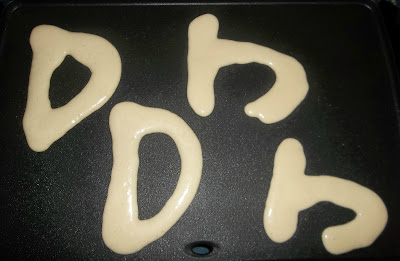
So I made homemade pancakes this morning and wanted to share my recipe with my readers. Also, I wanted to share a trick so you can be drawing like an artist when it comes to pancake shapes! This is also great for doing cooking with the kiddos.

Super Yummy Pancakes:
3 Cups Flour
3 tablespoons sugar (I use Spenda because I am diabetic and it comes out fine)
2 tablespoons baking powder
Dash of salt
3 eggs
2 1/4 Cups milk
3/4 cup melted margerine


Sift all the dry ingredients together and then slowly add the eggs. Whisk together and add the milk and margerine.


To make some awesome shapes, try this trick:

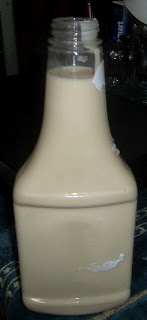
Save a squeezeable ketchup bottle and wash and dry well. Add your pancake batter to it using a funnel. Replace cap and draw till your heart’s content. What makes it fun is if you have a couple bottles and add food coloring to different batches of batter. Now you have colors! Have fun!

Julie Anne Rhodes Review

As a chef, I enjoy reading the wisdom of others in the kitchen. I love anything to do with food. You could call me a foodie, or you could just say I love to eat. Either way, I loved JuliAnneRhodes.com

The website is set up by a Personal Chef who wants to share her secrets that help you become more efficient in the kitchen and become a better cook. Premium members get to utilize the ‘Personal Chef Approach’ section.

There are some free parts of the website and there is a paid section as well.

In the free version of the website, readers will see:

~a free Inside Dish Newsletter and a slew of free recipes

Premium Members get to utilize:

~Weekly Menu Plan

~Premium recipes

~How-to videos

~Online forum to discuss things with other members

~A member profile

~The Inside Dish Newsletter (including archived issues!)

~Access to “Dear Jewels”, where you can ask questions to the chef herself!

Personally, I loved the info provided on the website, although for some reason I found it slightly hard to navigate. I suppose I just needed to maybe play around a bit more with it and I would have gotten the hang of it. I enjoyed the layout and color scheme and I loved the features of the premium membership. I also think it is affordable when you consider how much a person could save following the tips and menu plans laid out.

Julie Anne Rhodes is offering one lucky reader a chance to win a free month subscription to her website! Just enter on the Rafflecopter form below!Photobucket

Crispy Breaded Chicken Strips

A favorite around my house is my Crispy Breaded Chicken Strips.

One thing about me that will probably start to get on my reader’s nerves is the fact that I hardly ever measure anything and I cook based on taste and visualization.

I can only estimate how much of each ingredient I use, so proceed knowing that :)

Crispy Breaded Chicken Strips

* 3 boneless/skinless chicken breasts

* 1 cup of cornmeal

* 2 cups flour

* 1/2 cup panko breadcrumbs

* dash of salt

* Pepper

* Garlic powder

* onion powder

* Chilli pepper

* Milk

* Vegetable or Canola oil

1. Thin slice the chicken breasts. There should be two for each breast.

2. In a bowl, put about a cup of milk. In a seperate bowl, mix together all dry ingredients.

3. In a 10 or 12 inch skillet, heat about an inch of oil on med high.

4. Dip each breast in the milk, then coat well in the dry mixture. Gently dip back in the milk and then second coat it in the dry mix.

5. When the oil is heated enough, gently place in the oil, turning when one side is browned well.

6. Make sure the chicken is cooked thoroughly by checking the inside is at 165 degrees.

This is served well with my Magical Mashed potatoes!

Enjoy!

For a Printable version of this recipe click HERE

Tropical Traditions Coconut Oil Review and GIVEAWAY!

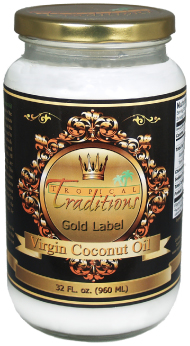
As someone who loves to cook, I was excited to get to try Tropical Traditions Gold Label Virgin Coconut oil. I know that coconut oil can really add some awesome flavor to a dish!

I was given a 32 oz size to review and I was very pleased when my first recipe with it tastes absolutely awesome!

Tropical Traditions makes their coconut oil the ‘old fashioned way’ with family producers in the Philippines using methods passed down for generations.

I decided to make a pot roast and then make tacos from the meat. I first made a roast, in water with a dash of ginger in it.

After it simmered all day in the crock pot, the time had come to use my Tropical Traditions Gold Label Coconut Oil. I put a tablespoon in a skillet, on low heat. I allowed it to turn from a hard fat into an oil and then I added shredded pot roast to it. The aroma was amazing. I then added taco seasonings to it and a bit of tomato paste.

It was absolutely delicious. The roast soaked up the oil and it gave it a wonderful taste. I added green leaf lettuce, black beans and a bit of mango-pineapple salsa. What a treat! My husband was drooling!

Tropical Traditions is offering one reader a chance to win!

Gold Label Virgin Coconut Oil - 32 oz.Win 1 quart of Gold Label Virgin Coconut Oil!
Tropical Traditions is America’s source for coconut oil. Their Gold Label Virgin Coconut Oil is hand crafted in small batches by family producers, and it is the highest quality coconut oil they offer. You can read more about how virgin coconut oil is different from other coconut oils on their website: What is Virgin Coconut Oil?
Tropical Traditions also carries other varieties of affordable high quality coconut oil. Visit their website to check on current sales, to learn about the many uses of coconut oil, and to read about all the advantages of buying coconut oil online. Since the FDA does not want us to discuss the health benefits of coconut oil on a page where it is being sold or given away, here is the best website to read about the health benefits of coconut oil.

Just enter on the Rafflecopter form below!

a Rafflecopter giveaway

Disclaimer: Tropical Traditions provided me with a free sample of this product to review, and I was under no obligation to review it if I so chose. Nor was I under any obligation to write a positive review or sponsor a product giveaway in return for the free product.

Cook’n recipe organizer Giveaway!

As an avid cook and a “foodie”, I have tons of recipes littering my kitchen. I often run out of ideas as well.

Don’t you ever get tired of Spaghetti and Tacos at home? I know I do!

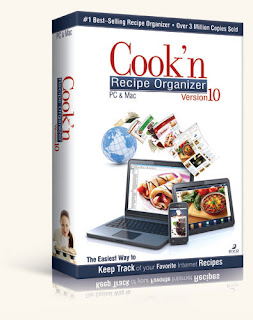
Here comes Cook’n to the rescue! One of the coolest features of Cook’n is the recipe search feature. You can literally sit down with no idea what to make for dinner and just put in a few keywords and Cook’n will help you figure it out in seconds!

Cook’n is like 5 programs in one!

*It’s a recipe organizer. You can input your own recipes into it and Cook’n will organize them for you!

*It’s a recipe database search engine. Just plug in a few keywords and find hundreds of recipes in one click!

*It’s a Menu planner. All you do is drag and drop your recipes into the calendar and your week is planned!

*It’s a grocery shopping assistant. Cook’n will organize your weekly shopping list down to the isle!

*It’s your personal nutritionist. Cook’n will analyze all your recipes, even the ones you put in and let you know nutritional content!

Busy Families NEED the Cook’n software!

Cook’n offers WEEKLY prize giveaways on their Facebook fanpage!

You can do a quick and easy download of the software at DVO, their website.

Please consider getting Cook’n. With today’s busy families and economy, Cook’n can help save you time and money! And there is nothing to lose. Cook’n has a 200% guarantee. Can you believe it?

I received one or more of the products mentioned above for free using Tomoson.com. Regardless, I only recommend products or services I use personally and believe will be good for my readers.

Cook’n would like to generously offer my readers a chance to win a FREE copy of thier software! Just enter on the Rafflecopter form below! If you can’t see the form, click “Read More” and GOOD LUCK!

a Rafflecopter giveaway

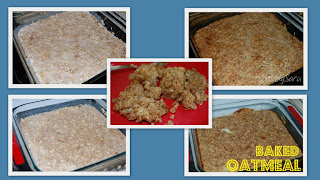
Baked Oatmeal Recipe

Today’s Guest post comes from Sensibly Sara! Her blog has wonderful giveaways, reviews, recipes, organization tips and much more!

Baked Oatmeal:

Ingredients:

1-1/2 cups heavy whipping cream
2 eggs, lightly beaten
2 tablespoons vegetable oil
1 tablespoon vanilla
2-1/2 cups oats (quick or old fashioned), uncooked*
1/2 cup firmly packed brown sugar
2 teaspoons baking powder
1-1/2 teaspoons ground cinnamon

Directions:

Heat oven to 350 degrees.
In medium bowl combine milk, eggs, oil and vanilla; mix well. Set aside.
In 8×8 square casserole pan, combine oats, sugar, baking powder, and cinnamon. Add to liquid ingredients in bowl; blend well. Let stand about 15 minutes.
Bake, uncovered, 35 to 45 minutes or until center is almost dry and firm to the touch. Cool slightly before serving.

**I got this recipe from a friend, but I am a rule-breaker and use heavy whipping cream in place of milk. You can make it either way.

Full Disclosure from Sara: I was not compensated for this post. I am sharing one of our favorite breakfast recipes (I did NOT create it, I merely altered it) because I thought you’d like it! :)

Crock Pot Creamy Italian Chicken recipe

I wanted to share with you this wonderful recipe from my bloggy friend at Life with Captain Fussy Buckets. It is for a crock post recipe and I know everyone could always use more of those for those busy nights!

Crock Pot Creamy Italian Chicken recipe

4-6 chicken breasts
1 cup water
1 package dry Italian seasoning/dressing mix
1 block cream cheese (we use fat free or reduced fat)
1 can cream of mushroom soup
rice or pasta

directions:

Put chicken, water, and seasoning/dressing mix on high for three hours.
After chicken is cooked, add soup and cream cheese. (I cut the chicken into smaller pieces at this point)
  • Cook another hour, stirring two or three times.


  • Serve over rice or pasta.

    Make sure you go visit Dena at Life with Captain Fussybuckets for more great recipes, giveaways and great reading :)


  • Skillet Bacon Jam Review

    Have you ever heard of Skillet Bacon Jam?

    I hadn’t either until I was given the opportunity to review it.

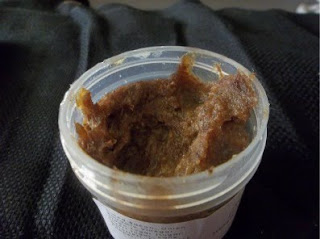
    I must say, at first, I was a bit intimidated by it. I was unsure what to eat it with, how it would taste and what in the world it was for. The first night I opened it, I let my husband smell it and he accidentally dumped the “juice” onto his shirt. He smelled like “bacon goo” as he called it after that.

    The look of it ain’t too pretty, but it’s one of those things that looks scary, but if you give it a chance, it really is a hidden gem in the food world.

    Because I was short on time, I didn’t have time to really try one of the recipes the website for the Skillet Bacon Jam offers, but I decided it might taste good as a topping on steak instead of the usual steak sauce.

    POW! I was right. I added it to the top of my steak just before it was done and let it’s juices mix with the steak and it was EXCELLENT! It has a tangy, sweet and smokey taste that really compliments the meat.

    I look forward to trying it in other things. I am thinking next time I will do double pork and add it to some ground pork and make pork cube steaks. My mouth is watering already.

    To purchase Skillet Bacon Jam and see the wonderful recipes that it goes good with, please visit www.skilletbaconjam.com

    For Inquires, please send a message to eat@skilletstreetfood.com

    Photobucket

    I received one or more of the products mentioned above for free using Tomoson.com. Regardless, I only recommend products or services I use personally and believe will be good for my readers.